
Needle Felting: The ONE Thing Nobody Teaches about needle placement
I know, a headline like that sounds like clickbait. But I’ll tell you what it is straight up that no one seems to teach when it comes to needle felting: that the placement and quantity of felting needles in your multi-needle holder makes a HUGE difference to your needle felting.
You may not have come across this yet if you primarily use a single needle. Once you do move into multi-needle tools, you’ll find that many needles too close together don’t penetrate the wool to actually felt. Instead, it’s best to let them act like single needles by spacing them out enough for what you’re working on. There’s more to it than that, and I’ll go into it in depth (and with illustrations) below to explain what I mean.
First, I’m sharing this because lately I’ve been paying a lot of attention to the information floating around the internet regarding needle felting. With my masterclass video workshop now live, I’m researching all the places to market it to reach my core audience. My students generally range from total beginners to advanced needle felters, but what they have in common is a mix of hope and frustration: seeing the potential of the art form but not knowing how to get the results they want.
If you’re reading this I’m going to assume you understand the basics of how needle felting works. (If not, read this previous blog post on felting needles). Needle felting has its own logic and ‘rules’ of how it works, and it helps to have some guidance to get a handle (pun not intended) on how to effectively and efficiently make what you want. If you’re self taught and paying attention you’ll get there, but it’s nice not to reinvent the wheel.
So as I was looking around online as if I were someone interested in a workshop, I observed that there are a lot of sources to answer the simple straightforward questions, like:
Why are my felting needles breaking? You’re applying sideways pressure somehow, make sure to go straight in and out, and don’t try to ‘turn corners’ with the needle. Read more on this topic in this post.
Which wool do I use? Coarse wool is easier to build up into 3D forms; I prefer Corriedale or Romney as ‘core’ wool to make shapes out of-- save the fine Merino for surface finishes.
How do I make my needle felting smooth? The more dense and firm your object, the easier it is to get a smooth, even finish-- add loose, fluffy wool going every which way as a finish layer, and (sorry to say) do a LOT of shallow poking all over to tack it in.
Those are important issues, especially for beginning needle felters. But there’s a larger question that seems to float around, hard to pin down and thus harder to answer. What it comes down to is:
Why is my needle felting not working like I want?
This could mean very different things to you depending on where you are in your needle felting journey. If you’re a total beginner, when you pick up a kit or watch a tutorial online and then try it out, there is often a disconnect between how it is ‘supposed’ to work-- how it is described or appears to work-- and the reality of actually poking wool into the shape you desire.
Part of the problem is a lack of understanding how long it might realistically take to make fluffy wool pack together enough to take on a cohesive shape. (It takes longer than you’d think to get a piece started, that’s the real leap of faith portion… but if you stick with it long enough it will magically achieve workable mass and get a lot easier).
Part of it is not knowing how firm and structural a thing ‘should’ be, since density is not easily communicated with words or video. (There is no ‘right’ answer here, but more dense is often easier to work with. If you squeeze your felt between your fingers and it squishes down by half, it’s probably too squishy. Add more wool or keep poking in towards its center, or do both).
Part of it is that people start by making teeny tiny things small enough to fit in the palm of their hand, which is challenging because there’s just so little wool to move around and shape, and at that scale every little poke can make big changes (or disfigure what you’ve already done). When you’re starting out, aim to make something at least as big as your closed fist. Or bigger!
Once you’ve started to find your way around needle felting (and haven’t been scared off by the time commitment and the occasional vicious self-poking of your fingers) that larger question of ‘things not working like you want’ really starts to come into play. Over my ten years of teaching needle felting I’ve noticed that there’s often a point at which students want to move from using a single needle to using multiples. Sometimes this happens quite early on, sometimes it takes a long while.
There’s the idea that using a multi-needle tool will speed up the process, which makes a lot of sense since it seems like 5 times as many needles should multiply your poking labor and minimize the time required. But that’s often where a big knowledge gap comes into play-- one that no one seems to talk about and one that causes a lot of frustration.
So I’ll say it again: the placement and quantity of felting needles in your multi-needle holder makes a HUGE difference to your needle felting. How many needles you use at once and how close together or far apart they are will absolutely impact the way the multi-holder tool works for you.
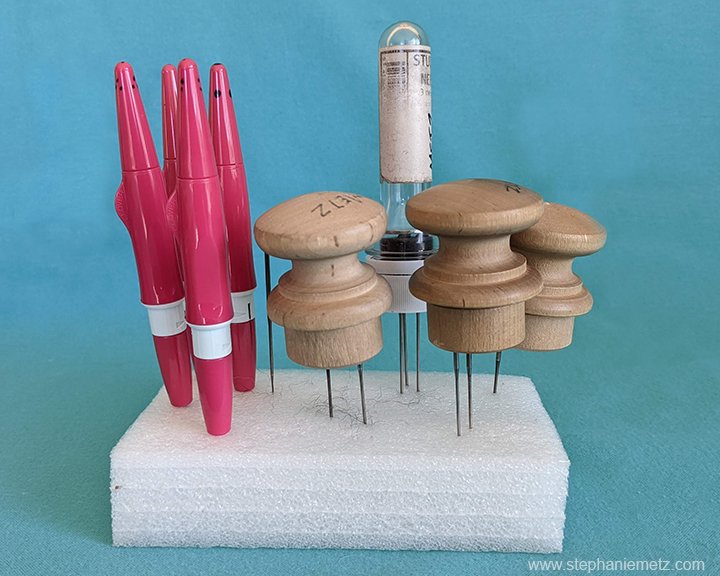
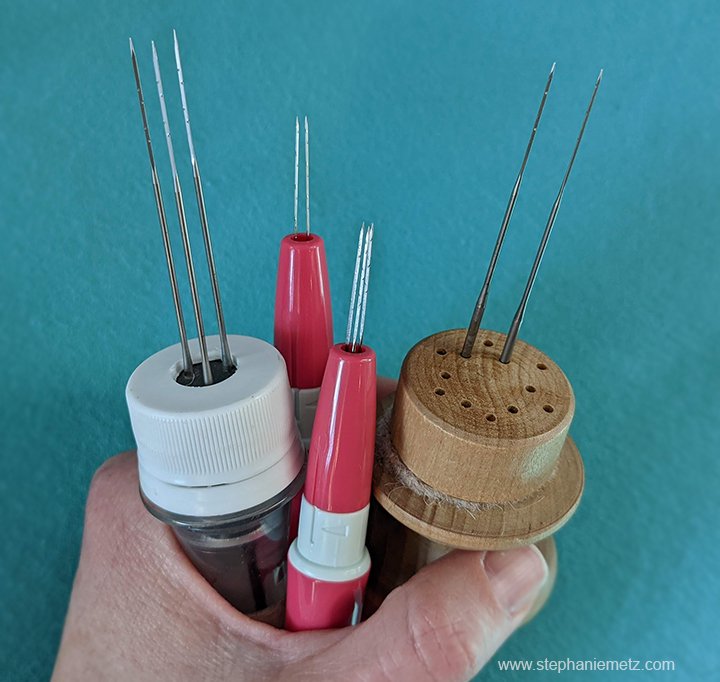
In my studio I keep no less than eight multi-needle tools at the ready- that’s my setup, pictured above, with all of them poked into a foam block and ready to use. You could certainly have just one, but even though it’s easy to open up these needle holders and take out or put in more needles, that takes time, and I like to move smoothly between different tools as I need them. Clearly some of them appear to be the same tool-- I have multiple copies of the knobby wooden holder, some of the pink pen-like tool, a plastic one-- but the different configurations of felting needles in them cause them to effectively behave like different tools, useful in different situations. More on that below (and these are the tools I swear by).
Multiple needle holders are great because they can hold lots of needles, and again, you’d think more needles equals faster felting. That’s true- but really only when you’re working on something flat and thin, so all the needles can enter the wool perpendicular to its surface, and the mass of fiber isn’t so thick that it offers much resistance. That’s what these things were designed for, after all— making flat sheets of industrial felt in a big machine, with hundreds of needles near to each other. But I NEVER find myself using ALL of the holes available in my big knobby felting tools because I generally don’t work flat, I work with three-dimensional forms.
If you HAVE tried multiple needles used together in one tool, you’ve probably noticed that if often just doesn’t seem to work very well. Despite all your hopes, you still keep reaching for a single needle for detailed surface work and deep-poking shaping work. For efficiency you dream of using more than one needle at a time… but in reality too many needles too close together can work against you. That’s the resistance you’re feeling when you start using multiple needles and suddenly they don’t seem to be doing anything. Here’s what’s happening:
A lot of needles really close together actually act kind of like a unit-- like a bed of nails, they distribute the pokiness, and none of them poke in very far, they just work together to push the whole mass. When they’re close together, multiple needles are also more likely to be pushing at different parts of the same fiber, which moves all of them instead of making them rub against their neighbors to tangle together and actually felt.
That can be good when you’re working more at the surface, applying color or smoothing things out. But when you’re trying to initially tame loose wool into a cohesive mass it’s more useful to poke deeply into the wool.
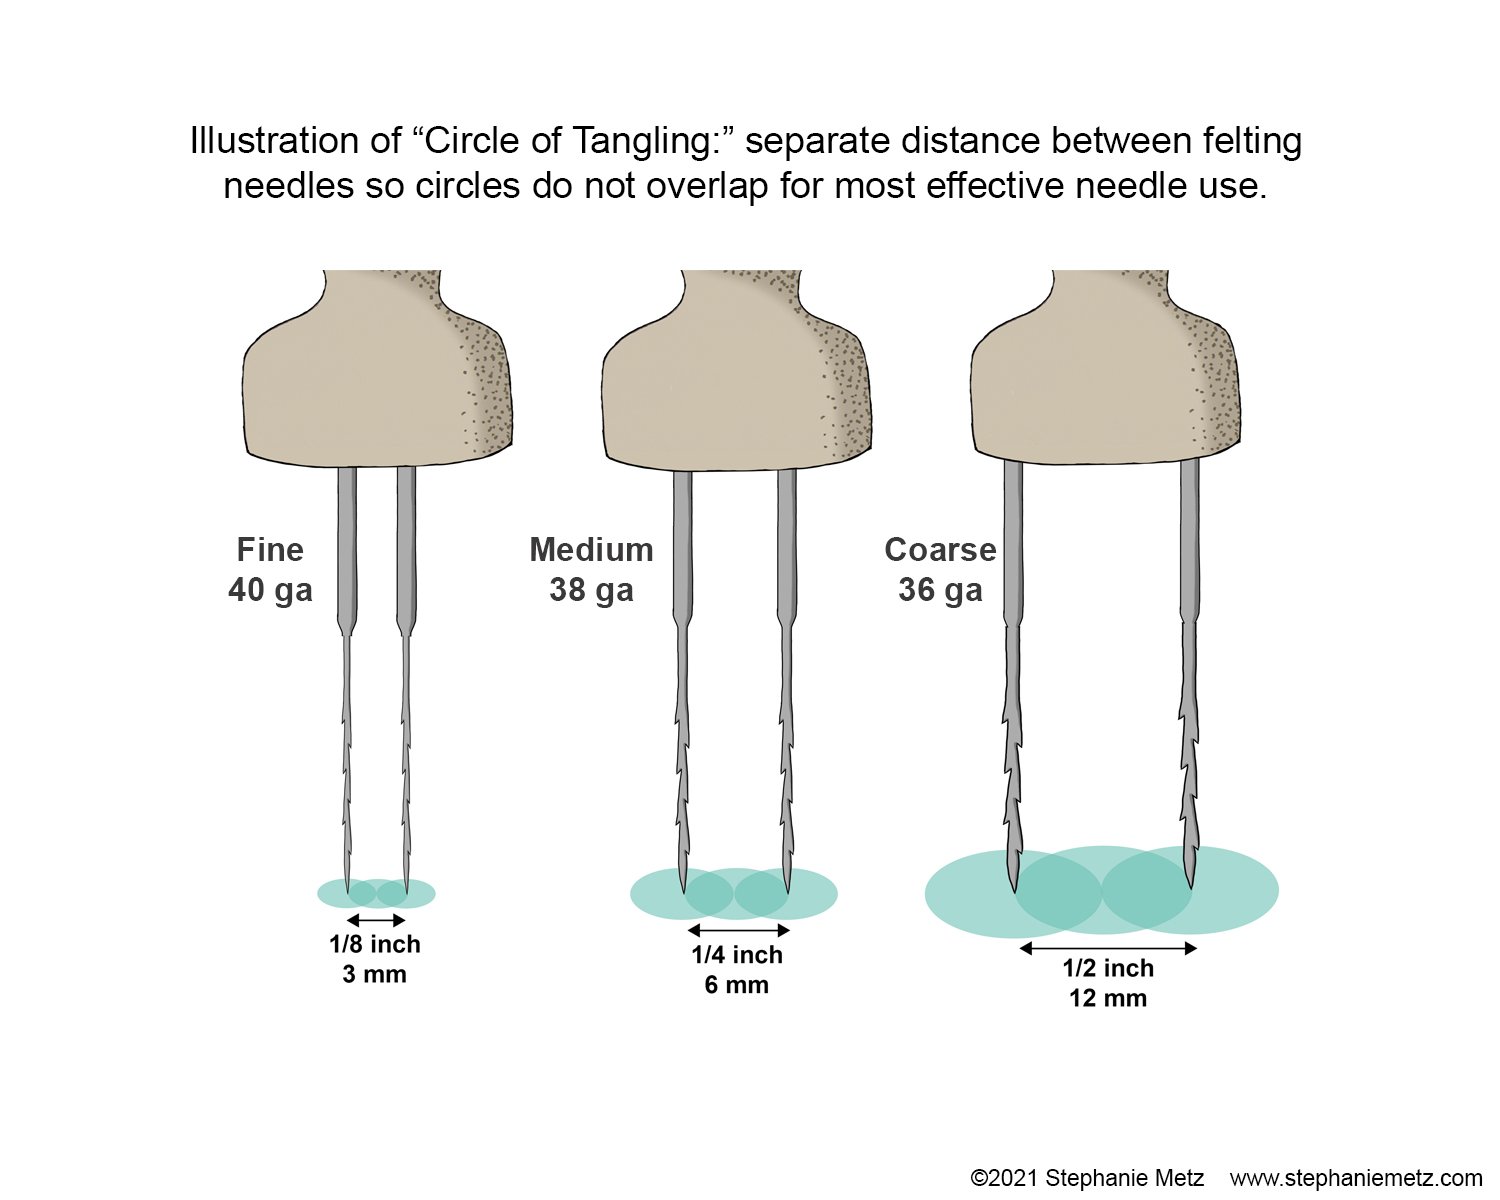
When felting needles are spaced farther apart they are able to actually act on the area underneath and surrounding the needle, penetrating the mass of wool, tangling fibers with each other, and really getting some felting done. Here’s where we get to the visuals.
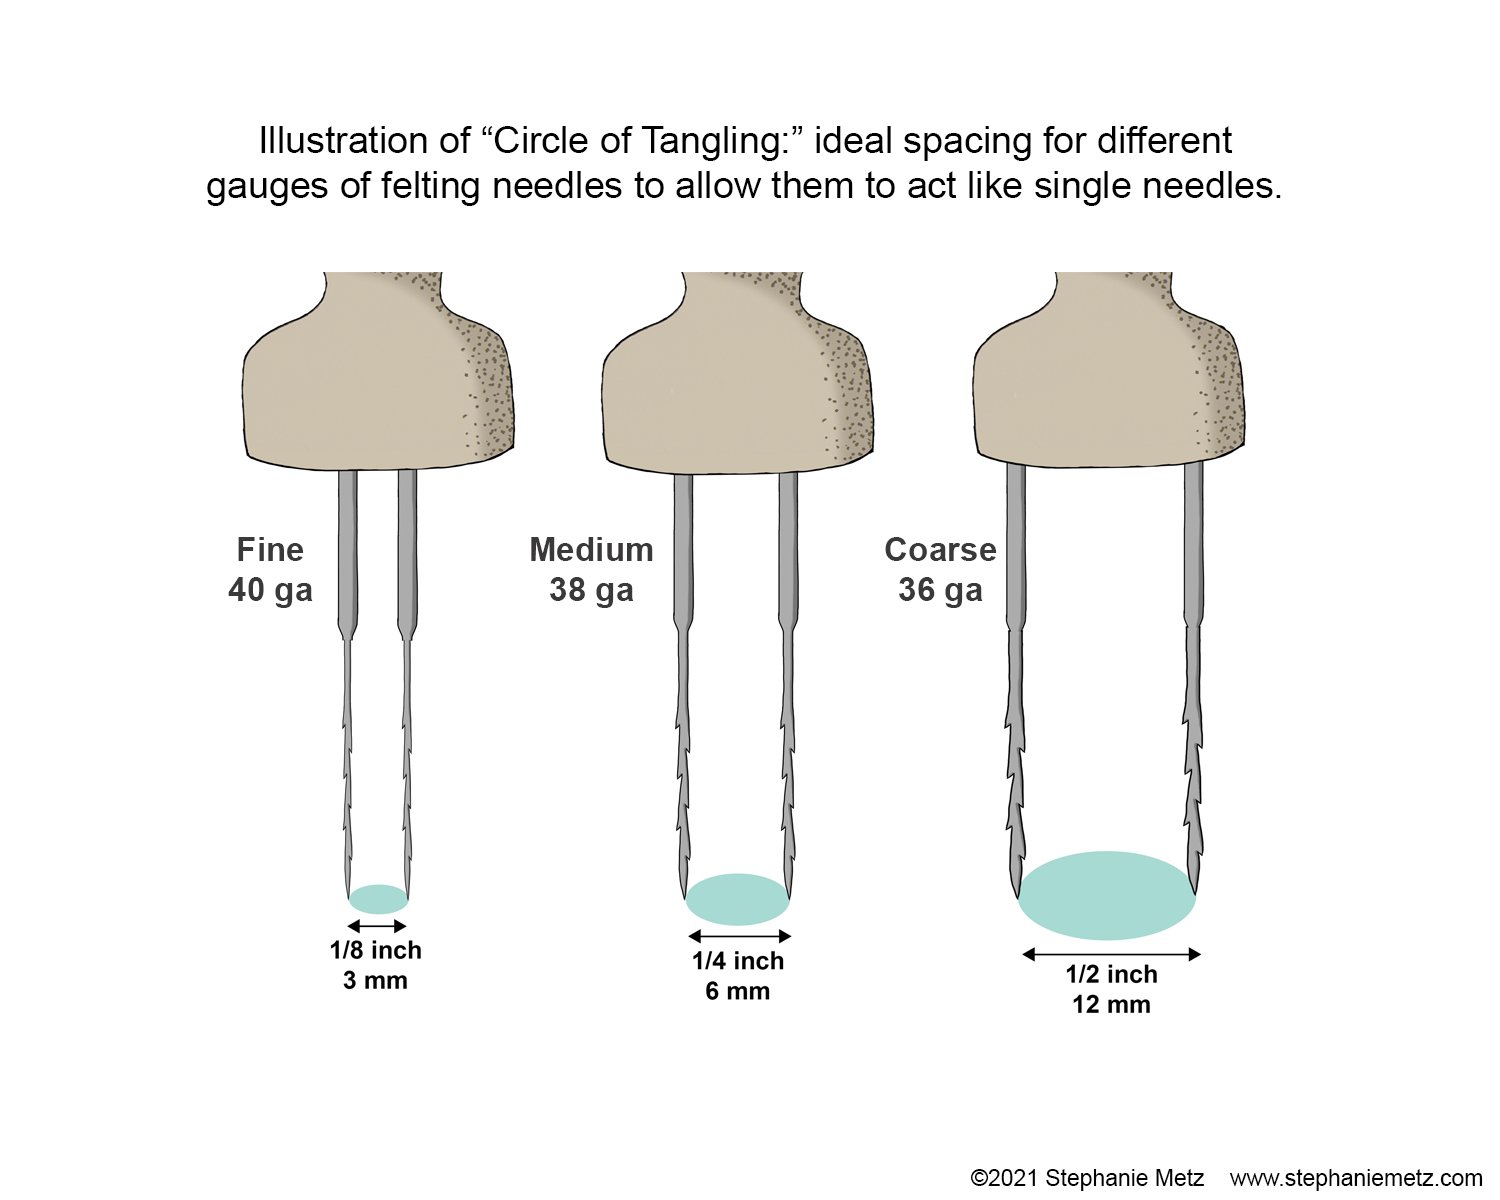
I’ve decided to coin a term for the effective space around each needle tip: introducing “The Circle Of Tangling.” When the Circle of Tangling of any one needle overlaps with another, they don’t penetrate like a single needle anymore, which means they don’t poke in very far. And the Circle of Tangling differs for coarse, medium, and fine needles.
Here’s a visual breakdown:
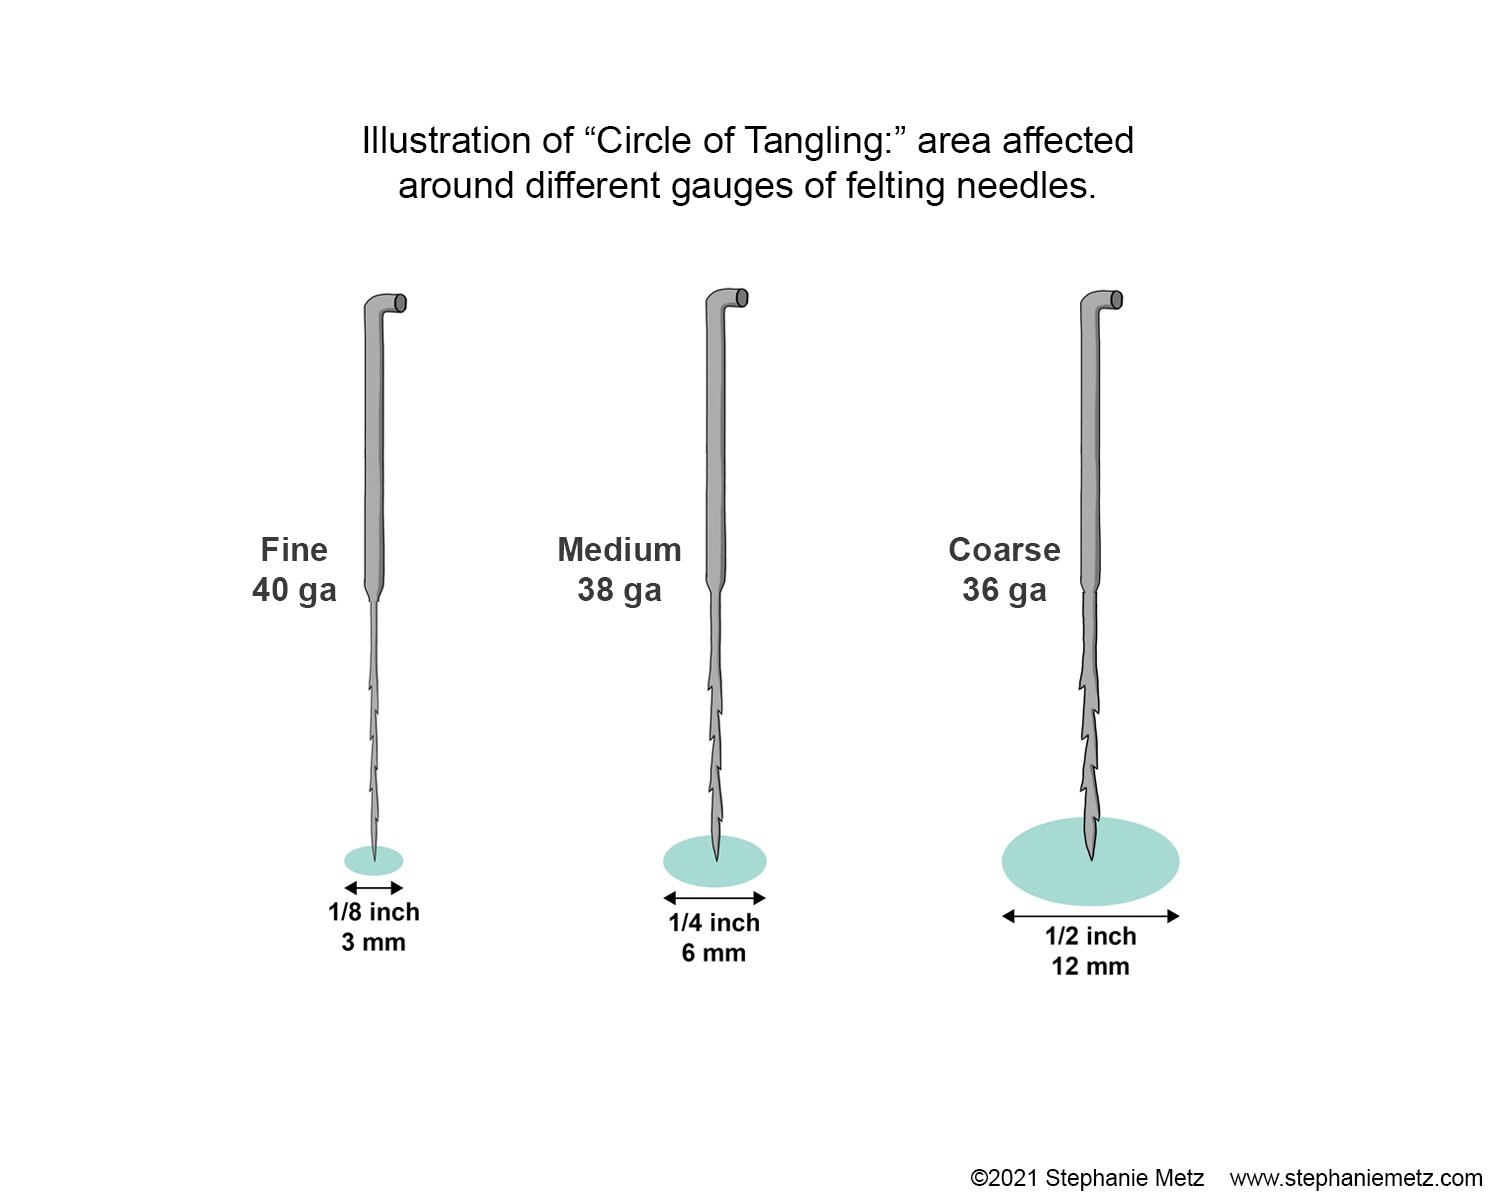
The smaller or finer the needle (with the confusingly higher number gauge size), the closer together you can place the needles and still have them penetrate the wool.
The bigger or coarser the needle (with the confusingly lower number gauge size), the farther apart they should be if you want them to really poke in. Another visual:
For a fine, 40 gauge needle the Circle is about ⅛ of an inch or 3mm wide.
For a medium, 38 gauge needle that Circle expands to about ¼ of an inch, or 6mm wide.
For a coarse 36 gauge needle that Circle grows to about ½ inch or 12 mm wide.
That means you want your needles to be no closer than a ‘Circle of Tangling’ width away from each other. Here are more pictures, for those of us who are visual creatures:
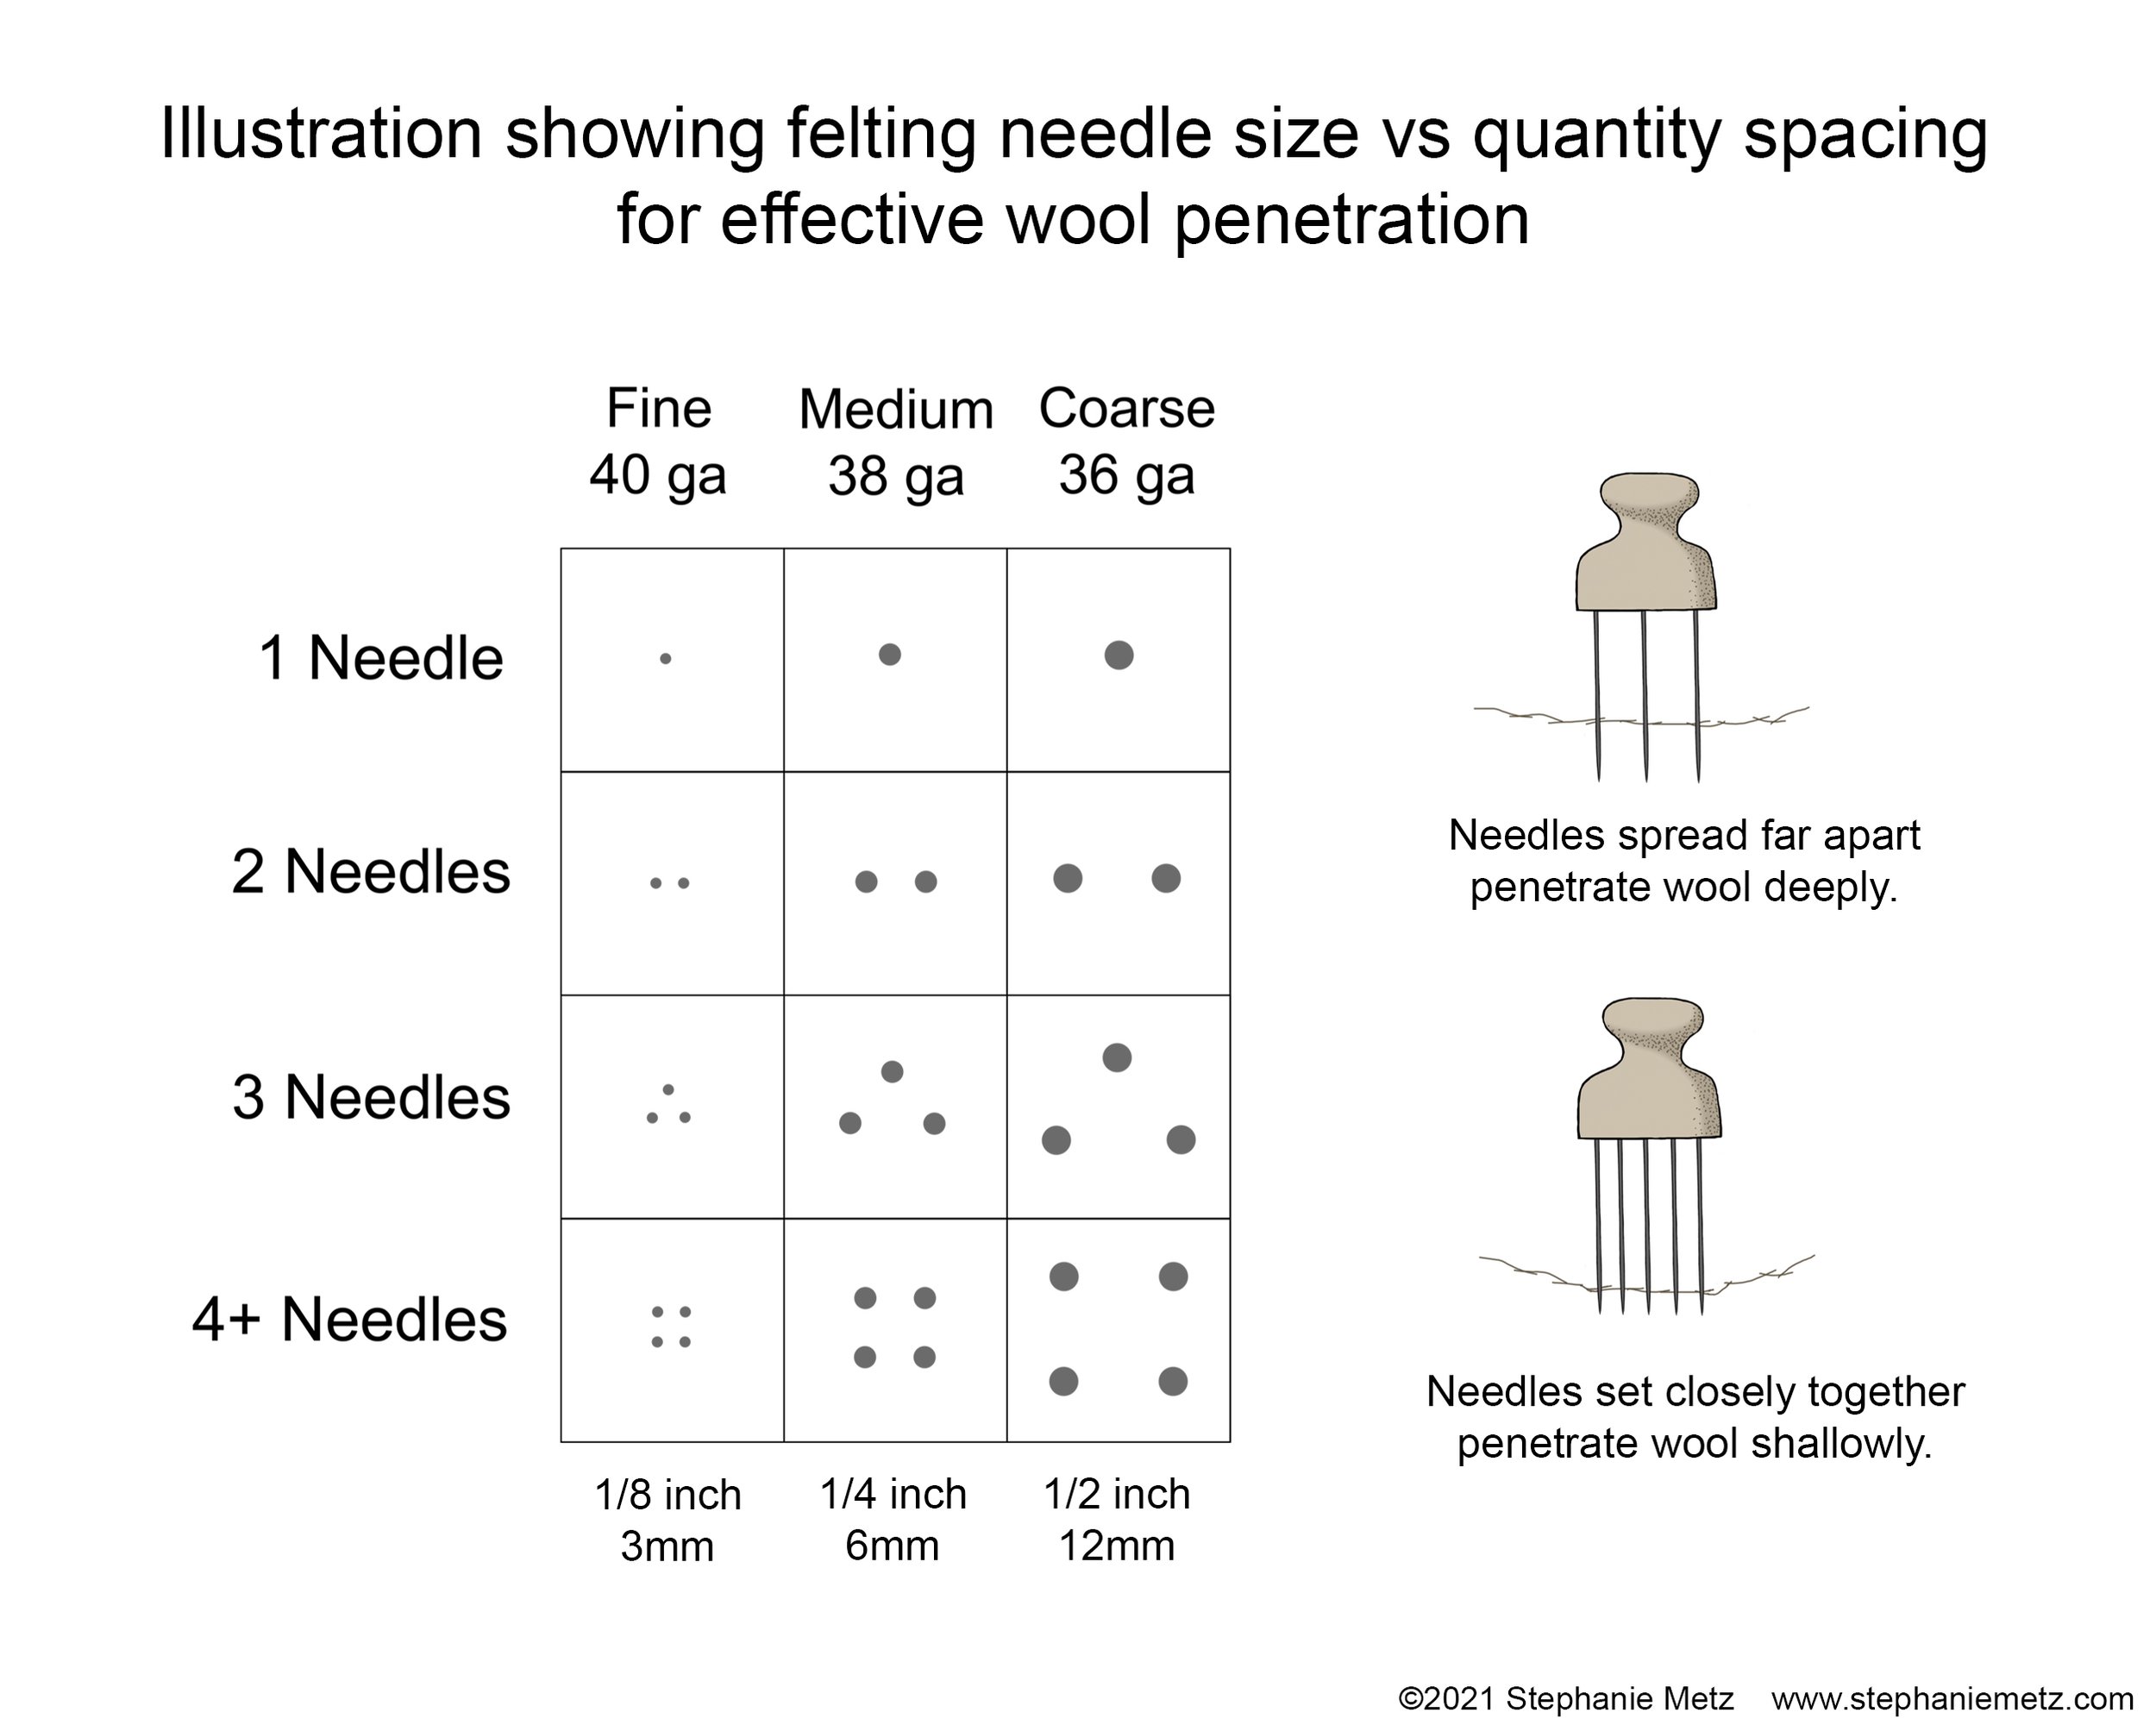
Given that reality, it’s pretty handy that most of the readymade multi needle holders out there are already designed with that approximate spacing:
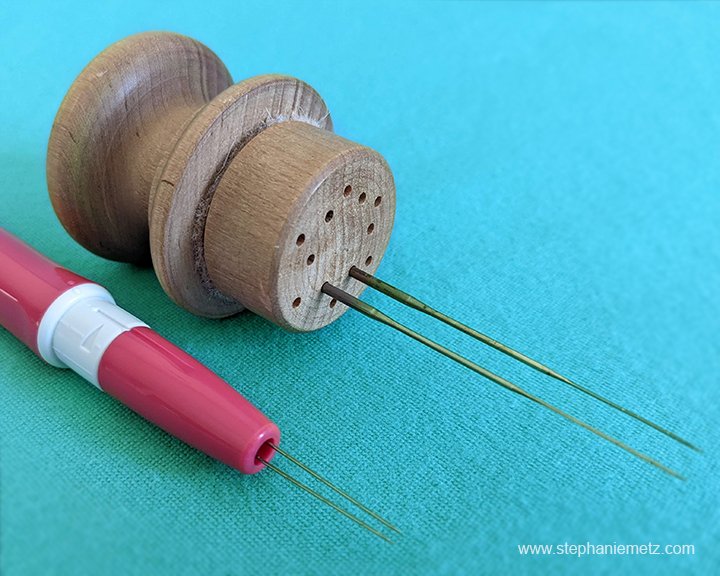
Two different designs of multi-needle holders show that ideal spacing is already designed in; on the small Clover Pen-Style pink tool, designed primarily for fine, detailed work, you can see that the needles are spaced about 1/8” apart. On the larger Colonial Felting Tool 2 you can see that you could choose to use holes about 1/4” apart or far more than that. Don’t think you have to use all the holes all the time.
Here’s the thing: if you use more than one needle but you position them far enough apart that their ‘circles of tangling’ don’t overlap, you can get the effectiveness of a single needle multiplied by the efficiency of more than one needle being used at a time. Read that over again, because I think it’s the most important part of this whole long-winded post.
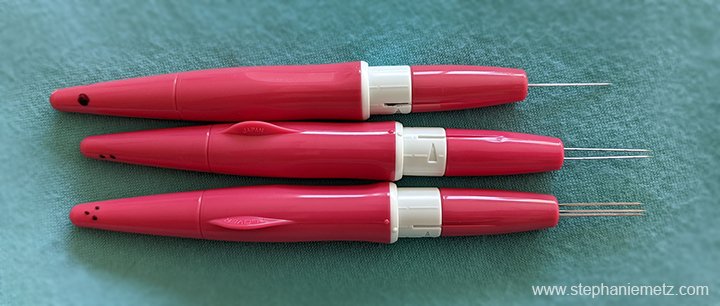
What does that mean? How does is actually apply to you? Well, take a look at three of my tools:
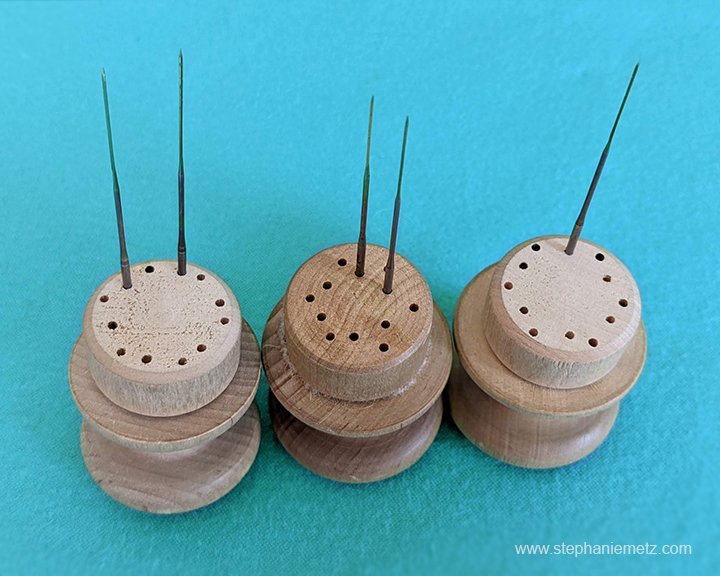
See all those unused holes? Those are not wasted space. That space gives me a lot of value. It gives me a lot of options for where to put my needles, which makes them effectively become different tools. I keep one holder with two needles about 1/2” apart, one with two 1/4” apart, and one with a single needle. All of these are holding 38-gauge needles, and when I grab any of these three tools and poke them into the same ball of felt they’ll penetrate into it differently. They’ll give a different feeling of resistance, and poke in deeper or shallower.
When I’m just starting in on a piece— let’s say I’m making a ball the size of my fist as a base shape— I’ll use the one on the left with the most spaced-out needles. They can easily poke all the way deeply into the wool I’m trying to tangle into a cohesive blob. At that stage I’m usually adding more wool, turning over the mass, and poking in from all sides. If I added even one more spaced out needle it would still work pretty well, but that’s one more needle to keep track of and not stab myself with, and at that point those needles may be too spread out for the overall size of the thing I’m shaping; one of them might miss entirely or glance off the side, possibly snapping off. And if I tried to use, oh, you know, TWELVE needles, they would barely penetrate at all and would just flatten the whole thing down.
When I’m a little farther in the process I’ll switch to the single needle to start honing the shape (yes, you read that right, a single needle), pushing down any high points and evening things out. When I’m ready to work more at the surface I grab the holder with the two needles 1/4” apart; it’s a good tool for shallower poking as I start to tack on and build up surface details. But then I often grab the single needle tool again(!) on and off throughout the process.
I switch between the different holders with their different configurations of needles quite often as I work on a piece— in response to the feeling of resistance I’m getting, or to poke more deeply or more shallowly. It becomes instinctive, but first you have to make yourself try it and pay attention to what you’re feeling and how things are working (or not working).
It’s surprising to note how differently the tools work and how much you do actually rely on feel as you’re felting. Even with the pen-shaped tool intended for tiny work, it’s remarkable what a difference you feel when using one, two, or three needles in it at a time. I also keep several of those at the ready— see below how I’ve marked dots on their ends with a pen so I can see at a glance how many needles they’re holding? When it comes to detail work I often find that two needles in the pen tool are ideal, because three resist too much and just don’t poke in far enough- by maybe 1/16 of an inch, but hey, that matters if you’re working at a scale small enough to be using this tool.
Speaking of scale, did you see how far apart the needles on those wooden knobby tools are? Can you infer that I’m not working on thumb-sized sculptures when the needles are that spread out? Again I’ll advise working LARGER, especially if you’re starting out, and especially if you want to use more than one needle at a time. You need SPACE. Forget the teeny tiny precious thing. Try something as big as your closed fist, if not bigger. It’s more forgiving and easier, trust me.
But the bad news is, even with this revelation on spacing out needles to use multiples, you still can’t throw a lot of needles at the problem and felt a lot faster unless you’re working on something bigger, say, head-sized (is it weird to relate everything to body parts?). You will find, I think, that you are working more effectively and efficiently when you’re using a few needles WELL.
As for me, I’m often working with just one or two needles. The effectiveness of the single needle is worth the additional poking, to my mind. Then again, I tend to make pretty firm sculptures (with minimal use of armatures) so it matters to me to have even the core of a piece be pretty structural and dense. I prefer to needle felt pretty deeply.
In conclusion, after 20 years of doing this (and 10 years of teaching it) I see that a lot of frustration in needle felting happens when there's a mismatch between the size, distance, and quantity of needles being used and the goal of the needle felter. So now you know:
If your multiple needles don’t seem to be poking in, try using fewer or moving them further apart. You don’t need to use all the holes in your multi-needle tool.
And when all else fails in a given situation, try using a single needle.
Really understanding how the needles work and trying different gauges and orientations of needles so you know how it feels to use them will really help you be effective AND efficient in your needle felting. You’ve read all the way through this lengthy post, so even if you take nothing else away from it, DO try using one, two, and three needles in different spacing arrangements on the same piece of felt and pay attention to how it feels. I swear it will help you be a better felter.
Want to go over all this and a lot more in video format? My sculptural needle felting masterclass is now available.
Want some guidance on my favorite tools? Check out this page to learn more and get your hands on tools of your own.
I’d love to hear your feedback- leave any questions or comments below.