
Why Do My Felting Needles Keep Breaking?
I’m back with another tool use tutorial. If you’ve been needle felting for any length of time you’ve likely broken a needle. Or two. Or a lot more. As strong as these steel tools are, they’re also surprisingly brittle at their tips. Whether that sharp little tip goes flying off into the carpet or embeds itself deep inside your project, a broken needle is frustrating. And there’s no repairing it, it’s a question of replacement. So how can you minimize the destruction of your tools and keep yourself and your surroundings safe from razor-sharp needle tips? First it’s worth taking a closer look at exactly why your felting needle is breaking in the first place.
Keep in mind that the felting needle was designed for a very specific function: to move precisely straight down with its tip sleeving into an awaiting hole several inches away, tangling any fibers in its path. That is to say, in an industrial setting the wool and other fibers fed into a felting machine are supported over a perforated base so the hundreds of felting needles mounted above can travel straight down through the fiber as the machine repeatedly lowers and raises them. Here’s a concept drawing of an industrial machine:
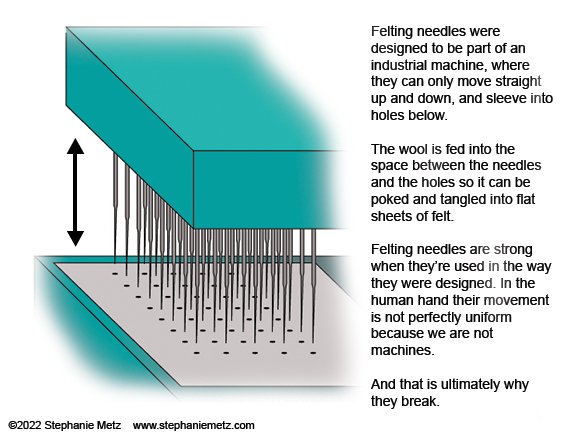
I often describe the industrial felting machine as a mouth full of teeth chewing—except the glaring problem with that metaphor is that most of the time teeth are grinding and moving sideways—there’s a lot of motion in the jaw. Not true with a felting machine: felting needles are purpose-built to move ONLY up and down. They’re quite strong in that plane of motion—but any sideways pressure to the tip will snap it easily.
The short answer to why your felting needle keeps breaking is that you’re using it wrong. You are not using it like you’re a precise machine. You’re either applying sideways pressure to the tip, or you’re running it into something hard.
So first of all, don’t beat yourself up about it. You’re NOT a machine! We’re adapting part of an industrial machine to hand use, and the element of chance that happens with hand work of any kind is going to always be a factor with this tool.
But even given your basic humanity (yay- machine-made things can be so boring)- there are some ways to avoid breakage, and it mostly comes down to attention. Not to say that you’re inattentive when you’re needle felting—you have to be, to avoid stabbing yourself and to get the wool to move how you want it to. But you have to train yourself to be aware in a few particular ways.
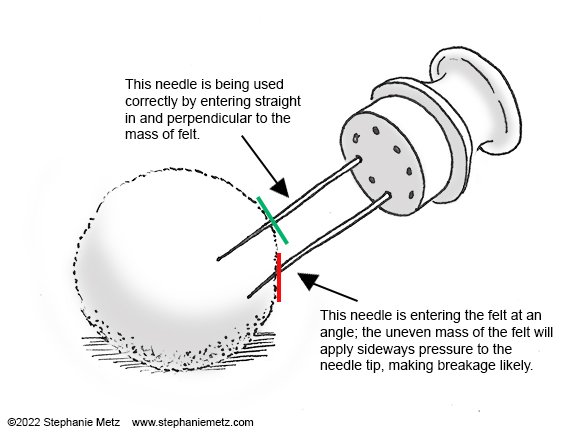
First of all, you need the needle to enter your mass of wool perpendicular to its surface (see the illustration below). That usually means manipulating and turning over the mass of felt you’re working on in concert with the motion and directionality of your tool-holding hand. This is increasingly important as your wool becomes increasingly densely felted as you proceed, because dense felt is firm enough to snap off a needle tip when the needle is plunged in or pulled out at an angle. I often see students trying to shape their felt by somehow turning a corner with the needle, which just plain doesn’t work.
You need to develop muscle memory of doing it the right way—straight in and out, pushing in and pulling out far enough that the needle comes all the way out before you push it in again instead of dragging it sideways. This takes attention and practice, but you’ll eventually not need to think about it as much.
Along the same vein, if you are using more than one needle in a multi-needle holder, you need to be sure that ALL of the needles are entering the fiber perpendicular to the surface you want to affect. Think about it: if your multi-needle holder allows you to position your needles ½ an inch apart, but you’re working on a sphere the size of a tennis ball, it’s possible that one of the two needles is not going in perpendicular. Here’s an illustration of what I mean and why that breaks your needle:
So that means that you should be thoughtful about what I refer to as the ‘footprint’ of your multi-needle tool—the spacing of the needles where they come out of the tool. You need that footprint to work with the size of the object you’re working on. The smaller the sculpture, the smaller the overall footprint of needles:
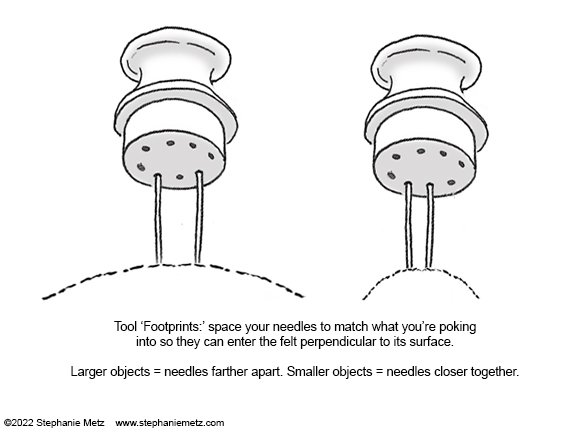
Spread your needles out too far from each other when you’re working on something small, and the odds are that at least of your needles will not be going in straight, or will miss the piece entirely and hit something else. Like the tabletop.
Speaking of the tabletop, it’s probably made of a hard material. Breakage also occurs when the needle encounters something hard; with nowhere to go and continued momentum and force, the needle will bend and then snap. This hard, resisting object could be your tabletop, or a wire armature inside your sculpture. With armature wire it can be particularly difficult to avoid felting too close; the wire is, after all, inside the felt. Whether you’re entirely building up wool around said wire or cutting into a nearly finished limb to add in a wire and close the felt back up again, you’re going to probably hit that wire at some point. Again, attention is key- but so is some finesse.
When you’re felting into something with a known hard element inside, use a single needle so you only have to keep track of one, and use a much lighter, looser grip on the needle holder, so when you DO inevitably get too close to the wire you’ll feel it and remove pressure without that fatal breakage. I do this a lot and, like all of this, it takes practice. I’ve definitely felt the needle flex but then withdrawn it before it breaks. It takes concentration to use delicacy.
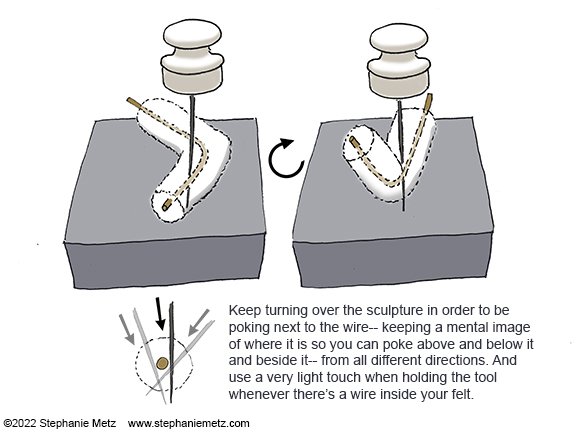
Using attention, a single needle and a light touch will help you be aware of where the invisible wire is within your piece, and you can use that mental map to try to felt across or next to the wire from all sides, rather than straight into it. This will require turning over and manipulating your piece so you can work above and below and next to the wire, like this:
I personally favor inserting armature wires AFTER much of the felting has been done; I use a sharp blade to cut a channel into the nearly-finished felt and then only need to patch and felt across that section. Wrapping fiber around wire from the start and then felting all around it just gives you more opportunities to hit the wire and break a needle. I go deeply into this with visuals in my video based master class Sculptural Needle Felting: The Comprehensive Guide (self-promotion alert! But hey, I am VERY proud of it and I’m getting great reviews from students).
My final bit of advice for avoiding breakage: manage your needles well when you’re not actively using them. Don’t let your needle holder go rolling across your desk and onto the floor- I know I’ve broken a few needles that way. Have a system in place to keep your needles and holders, even if that’s just a piece of foam to jam them into.
Now go forth and be aware of your wickedly sharp but delicate tools. Needle felting is an excellent means to practice self-awareness and creativity at the same time.
If you have any other great advice for NOT breaking your needles, please comment!